- Home
- All Occasion
- Gollum Cake
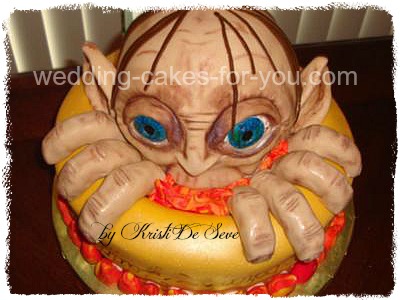
Gollum Cake
by Kristi De Seve
(Satellite Beach, FL)


|


|
I made this Gollum cake for a friend whose son was turning 15. It was to be a surprise and remembering teenagers, I knew it had to be over-the-top to impress.
Cake Flavors
The bottom cake was two layers of vanilla cake with butter cream frosting - his favorite. The head, another two layers of vanilla, but I snuck in a third layer of key lime pound cake; I AM in Florida, after all... That was the easy part.
After creating the idea in a drawing, all I needed to do was mix the fondant colors for "the ring" and the skin for Mr. Gollum. I used a store bought brand of fondant but I am seriously considering making my own on my next cake. So, if anyone knows of a good recipe, please add it to the comments section. Thanks.
Gum Paste Fingers
I needed fingers so I used gum paste and a mold for skeleton fingers I found at the craft store. I then covered those (perfect for knuckles and joints) with the "skin", made nail beds and wrinkles, brushed on "dirt" (edible powders) in the creases and nails...this is my FAVORITE part of creating cakes!
Luster Dust and Paste Food Colors
Anyway, the gold of the ring was achieved by using a golden yellow and brown color paste brown, and 2 bottles of gold luster dust. Then, I gave it an additional coat of gold luster just to really make it shine.
The Elvish writing is something I found on the internet and I have no idea what it says, but it was so beautiful. I copied it, by hand, with some brown color paste and vodka, adding in MORE luster dust. The flesh was made with a combo of ivory, brown and red color paste. I did not write down the ratio but it turned out perfect!
Gum Paste And Isomalt For Eyes
I made the eye shapes from gum paste. Then, I made hard candy, colored blue/green from isomalt and poured this into a mold I created from a food-safe silicone plastique. A quarter was used to create the ring of color (iris) and a little nubbin in the middle did the trick to create the pupil. The iris was laid on the white eye shape; I used edible red marker for bloodshot eyes.
Creating The Sculpted Head
After covering the sculpted head, I placed the eyes into the eye grooves and then layered fondant to create the lids and brow. Using edible powder in shades of brown and lilac, I created shadows and depth, and Gollum's haggard look. Some mistakes were made and I learned quite a bit. This was my very first cake of a full head/face.
Using Dowels And Finishing Touches
The head was placed in the middle of the finished ring with dowel supports. After placing the fingers, finishing touches were the flames/fires of Mt. Doom that Gollum is falling into with the ring.
The party was over this past weekend and the young man loved it!! It was a lot of work, but I love getting this experience. I don't know if I will ever have a business. I'm just in it for the end product that comes from the creativity. Hope you like it!
Like it? It's fabulous! Kristi you are very talented and creative-amazing! Thank you and good luck in the cake decorating contest. Here is the fondant recipe on this website. Try that one. I have made it and its good. But personally I would rather purchase it. I use Satin Ice now.
Comments for Gollum Cake
|
||
|
||
|
||
|
||
|
||
This article was printed from Wedding-Cakes-For-You.com
Step-by-Step Book

Video Guides


Order a Cake
"Lorelie is simply the CAKE FAIRY!!!!! and her heart is as big as her cakes are delicious and gorgeous. People are still talking about our cake almost three years later".
~Maceo & Corina~ New York City
Complimentary
For my Visitors and Subscribers


